

How I Create Candy Crush stylized game in Unity


I've always loved playing Match-3 games like Candy Crush. They're simple, fun, and very addictive. This inspired me to make my own Match-3 game in Unity. I also wanted to help beginners learn how to make their own games too.
Making games with Unity taught me a lot, especially about adapting to new changes.

For example, when Apple updated iOS in 2021, it changed how games could track players. This made it harder to get new players, but I learned to adapt and find new ways to attract people to my game. I used different marketing strategies, like advertising on TikTok and focusing on a few big campaigns instead of many small ones
I also noticed that even though Match-3 games have been around for a while, people still love new ones that are fun and different. This encouraged me to add unique features to my game. For those who want to know how to make a match 3 game I got some answers.
Match-3 games are made of three elements: animation, art and development. You can’t do anything without them.

This is the base knowledge for any easy games to make in Unity. Animations are key in making a game feel alive. Things like explosions, sparkles or candies disappear and new ones pop up - how will you make a game without them? In my project, I worked on making these animations smooth and responsive, so every match in the game felt good. I also discovered that outsource animation work can save a lot of time and money.
The visuals of the game are super important too. I chose bright colors and designed various candies to make the game not only look good but also play well, as players can easily tell the candies apart.
Getting Started with Unity
Steps to install Unity and set up a new project:
Installing Unity
Download the Unity Editor. Navigate to Unity's download page.
Select the download link appropriate for your operating system
(Windows, Mac, or Linux).Upon completion of the download, open the Unity Hub application. If it doesn't open automatically, locate and launch it manually from your applications folder.
You'll be prompted to either sign in or create a new Unity account. If you're using Unity under an educational grant or a specific license, enter the provided ID. Otherwise, use your existing Unity ID or opt to create a new account. Keep in mind that creating a Unity account may have different age requirements depending on your country, so please review the Unity Terms of Service for detailed information.
Once logged in, you'll be directed to a splash screen with an option to install the Unity Editor. Click the corresponding button to begin the installation process. This step may take some time, depending on your internet connection and computer specifications.
Setting Up a New Project
Within Unity Hub, navigate to the “Projects” tab and click the “New Project” button. You'll be given the option to choose from various project templates. For a Match-3 game, I advise you to start with a 2D template.
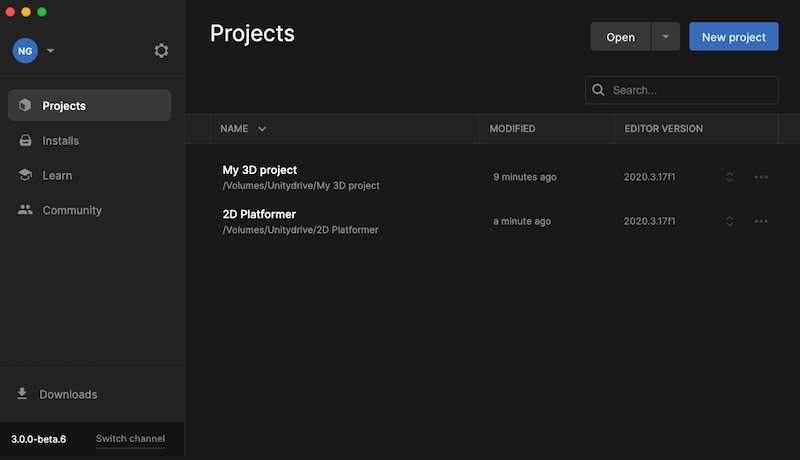
Enter a name for your project and select a location on your computer where the project files will be stored. You can also set other initial settings, such as the Unity version to use (it's best to select the latest stable version unless you have specific requirements).
After configuring your project settings, click the “Create” button. Unity will then set up your new project and open it in the Unity Editor.
Take some time to explore the Unity Editor's interface, including the Scene view, Game view, Hierarchy, Project, and Inspector panels.

Designing Match-3 Game Concept
Before making a Match-3 or less than 3 game, it's super important to plan and design your game's idea. This early step sets up what your game will be like, including how it plays, looks, and what special thing makes it different. Getting this right can make your game a hit or a miss with players.
Planning is about understanding Match-3 games - what players like about them, and thinking about how to make your game stand out. Candy Crush stylized games have mixed in new ideas with the usual match 3 game design formula, keeping players interested. Good planning means having a solid plan, setting goals, and being ready for any bumps along the way.
![]()
Creating the Board in Unity
Getting your Match-3 game started in Unity involves a foundational step: setting up the game board.
Initial setup
First thing in Unity Match 3 tutorial - you'll need to get the Unity environment ready for your Match-3 game project. After downloading the Unity Editor & Match 3 game starter, open the provided starter project, which is organized with assets. You'll work with BoardManager.cs and Tile.cs scripts for the board setup.
Animations: includes animations for the game-over screen.
Audio: features the game's soundtrack and sound effects.
Fonts: stores the typefaces used throughout the game.
Prefabs: comprises different management tools, user interface elements, and tile prefabs.
Scenes: encompasses both the main menu and gameplay scenes.
Scripts: houses the code driving the game, specifically focusing on BoardManager.cs and Tile.cs for modifications.
Sprites: contains user interface designs and a variety of character sprites for the game's tiles.
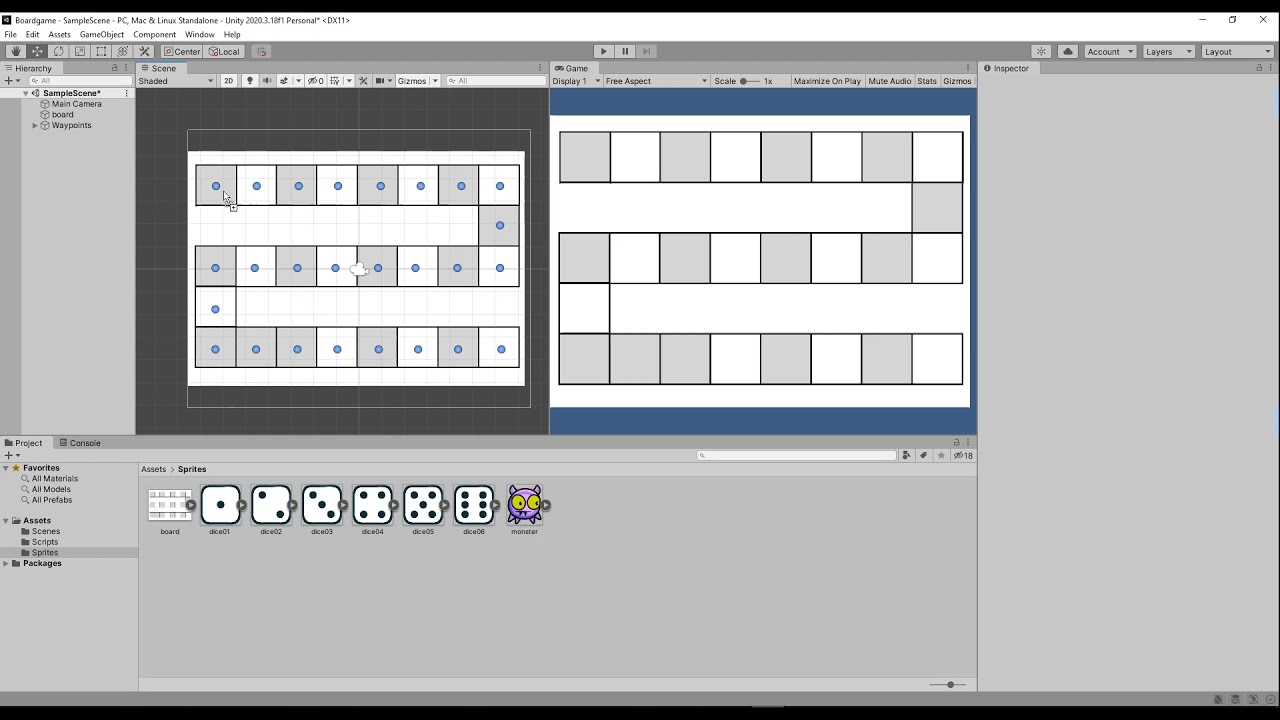
Crafting the game board
With the starter project set up, go to the Game scene and start it to reveal a basic setup: a simplistic blue backdrop with counters for score and moves.
To materialize the board, the CreateBoard() function initializes a grid based on the specified dimensions. It employs a loop to instantiate tiles, placing them in rows and columns to form the game board. This method cleverly calculates the starting position to ensure the board aligns well within the game's visual frame.
After setting up your sprites and defining the board's size in the Unity Inspector, you might notice the board extends offscreen. This issue is remedied by adjusting the BoardManager's position to anchor the board's bottom left corner within the camera's view.
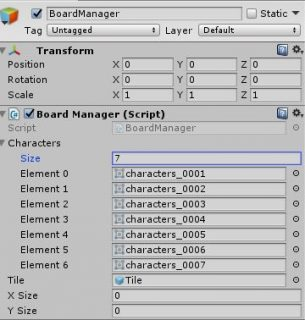
Initialize the board manager
Create an empty GameObject named BoardManager. This GameObject is important for generating and managing the game board. Attach the BoardManager.cs script to this GameObject to imbue it with the logic required for board creation. This script is structured with elements for board setup:
A Singleton pattern ensures that BoardManager can be accessed from other scripts.
A list of sprites will represent the tile pieces on the board.
Prefab information and board dimensions (xSize, ySize) are specified to dictate the layout and size of the board.
A 2D array keeps track of the tiles, while a boolean flag IsShifting checks for matches and board refills.

The Start() method activates the board creation process, using the tile prefab's dimensions to lay out the grid systematically.
Diving into the code
BoardManager.cs script outlines the skeleton for board generation and management, featuring:
Singleton pattern: a design pattern ensuring that BoardManager is accessible globally, facilitating interactions from other scripts.
Tile sprites: a list named characters holding the sprites to visually represent the game's tiles.
Tile prefab: the blueprint for instantiating board tiles.
Board dimensions: Variables xSize and ySize determine the board's size.
Tiles array: a two-dimensional array tracking the instantiated tiles on the board.
Tile shifting: a boolean IsShifting flags when tiles are shifting, indicating matches and board refills.
Board creation: the Start() method activates board generation, setting up tile positioning based on the prefab's dimensions and creating a grid layout through iteration.
public static BoardManager instance;     // 1
    public List<Sprite> characters = new List<Sprite>();     // 2
    public GameObject tile;      // 3
    public int xSize, ySize;     // 4

    private GameObject[,] tiles;      // 5

    public bool IsShifting { get; set; }     // 6

    void Start () {
        instance = GetComponent<BoardManager>();     // 7

        Vector2 offset = tile.GetComponent<SpriteRenderer>().bounds.size;
        CreateBoard(offset.x, offset.y);     // 8
    }

    private void CreateBoard (float xOffset, float yOffset) {
        tiles = new GameObject[xSize, ySize];     // 9

        float startX = transform.position.x;     // 10
        float startY = transform.position.y;

        for (int x = 0; x < xSize; x++) {      // 11
            for (int y = 0; y < ySize; y++) {
                GameObject newTile = Instantiate(tile, new Vector3(startX + (xOffset * x), startY +                                                                 (yOffset * y), 0), tile.transform.rotation);
                tiles[x, y] = newTile;
            }
        }
    }
Board generation adjustments
Upon initial play, the board might extend beyond the viewable area due to its generation starting from the BoardManager's position. Adjust the BoardManager's position to ensure the board fits within the camera's viewpoint.
Adding randomization to the gameplay
To avoid a monotonous start, integrate randomization in tile appearances by modifying the CreateBoard method. Set the parent of tiles to the BoardManager for organizational purposes, randomly selecting sprites for each tile.
newTile.transform.parent = transform; // 1
Sprite newSprite = characters[Random.Range(0, characters.Count)]; // 2
newTile.GetComponent<SpriteRenderer>().sprite = newSprite; // 3
Enhancing board dynamics
A static board wouldn’t suffice for the engaging Match-3 gameplay. The addition of code snippets to randomize the tiles ensures each game starts with a unique puzzle. By setting each tile’s parent to the BoardManager and randomly assigning sprites from your character list, the board springs to life with a colorful array of tiles.
![]()
Building Match-3 Mechanics
Making a Match-3 game needs a good understanding of how these games work, plus something to spark your creativity. For me, that spark was Berry Match, a game made by Turkish developers in the style of Royal Match, with help from RetroStyle Games. Their creative mix of classic Match-3 gameplay with new twists really stood out to me and helped shape my own game.
The main actions in Match-3 games are swapping and matching pieces. Inspired by Berry Match, I wanted to make these actions easy to use but also interesting and challenging.
Swapping: switch two pieces next to each other to make a line of three or more matching pieces. Inspired by Berry Match, I made a system where players can easily swap pieces, and potential moves are highlighted.
Matching: finding and clearing groups of three or more matching pieces. Following Berry Match's lead, I added special matches like T-shapes or L-shapes that trigger cool effects and bonuses.

Implementing Free-to-play Match-3 Game Economy
An effectively used game economy can enhance player satisfaction, extend lifetime value, and ensure a steady stream of revenue.
Balancing Currency and Resources
Soft currency: easily earned through gameplay, used for common transactions and progression.
Hard currency: acquired in smaller quantities, often through purchases or significant achievements. It's typically used for premium or time-saving items.
Resources: special items or boosts that aid in gameplay, such as power-ups in Match-3 games.
Progression and Reward Systems
Progression systems that gradually increase in difficulty can motivate players to continue playing and explore monetization options to overcome challenges. Reward systems, including daily bonuses, achievements, and milestone gifts, make players engage with the game more.
Monetization Strategies
Offering items, currency, or advantages that enhance gameplay or aesthetic enjoyment.
Integrating ads in a non-intrusive manner, such as rewarded videos that offer in-game bonuses for viewing.
Providing access to exclusive content or benefits over a set period.
User Engagement and Retention
Introducing new levels, challenges, and events.
Encouraging player interaction through leaderboards, friend challenges, and social media sharing.
Listening to player feedback and adjusting the game economy and features accordingly.

Testing and Polishing Your Game
Iterative Testing Process
Start by testing your game's basic functionality to identify any obvious bugs or performance issues.
Release your game to a small group of testers or a closed beta community. Use their feedback to identify areas of improvement, focusing on gameplay, user interface, and any bugs they encounter.
Based on the feedback, make the necessary adjustments to your game. This could involve fixing bugs, tweaking gameplay mechanics, or improving visual elements.
Repeat the cycle of testing, feedback gathering, implementing changes, and retesting.
Using Unity's Tools for Debugging and Performance Improvement
Unity provides several tools that can be instrumental in testing and polishing your game:
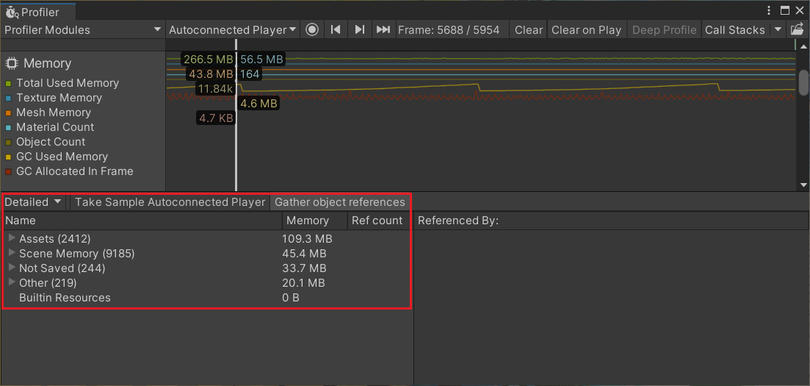
Unity profiler: allows you to monitor your game’s performance in real-time. Use it to identify performance bottlenecks, memory leaks, and other issues that could affect gameplay smoothness.
Unity debugger: part of Unity's IDE, the debugger lets you pause the execution of your Unity Match 3 game and inspect the current state of the game objects and variables. It's invaluable for identifying and fixing logical errors in your code.
Unity test runner: this tool enables you to write and run automated tests for your game, ensuring that your code works as expected and helping you to quickly identify when something breaks.
Addressable asset system: manage your game's assets more efficiently, reducing load times and improving overall performance. It's particularly useful for large games with many assets.
Launching Your Game
Successful game launch strategies also means marketing, App Store Optimization (ASO), and selecting the right platforms for publication.
Final Preparations Before Launch
Conduct thorough testing across all devices and platforms to ensure your game is bug-free.
Gather final feedback from a closed group of testers to catch any last-minute issues and gauge player reactions.
Consider localizing your game's content to reach a broader audience and increase its global appeal.

Marketing Your Game
Establish a website and social media profiles for your game early on to start building a community and generate interest.
Share behind-the-scenes content, development blogs, and teasers to engage potential players and keep them interested.
Collaborate with influencers and content creators to reach a wider audience through platforms like Twitch and YouTube.
![]()
App Store Optimization (ASO)
Your game's icon is the first thing potential players will see. Conduct A/B testing on different icons to determine which one captures the most attention and drives downloads.
Make sure your game's title and description contain relevant keywords to improve search visibility while clearly conveying the game's essence.
Use high-quality screenshots and gameplay videos to showcase the best features of your game, encouraging store visitors to download.
Publication on Platforms
Evaluate which platforms (iOS, Android, Steam, etc.) are most suited to your game's target audience.
Each platform has its submission process, guidelines, and review times. Familiarize yourself with these requirements well in advance of your planned launch date.
Decide on your game's pricing model (free-to-play, paid, in-app purchases) based on your market research and the nature of your game.

Additional Mobile Game Promotion Types
Partner with other game developers to promote each other's Match 3 type games to your respective audiences.
Host in-game events or competitions post-launch to keep your community engaged and attract new players.
Collect email addresses (with permission) during the pre-launch phase to notify potential players when the game is available.
This is how you can increase your game's chances of success. Continuous engagement, updates, and marketing efforts are key to maintaining and growing your player base.